How to indent in Excel [multiple solutions + keyboard shortcut]
Excel is great at manipulating and sharing data, but it sure doesn’t shine when it comes to text formatting. However, simple changes like indenting text can significantly improve readability. In this short Excel tutorial, I will show you how to indent In Excel.
Indent using Ribbon Options
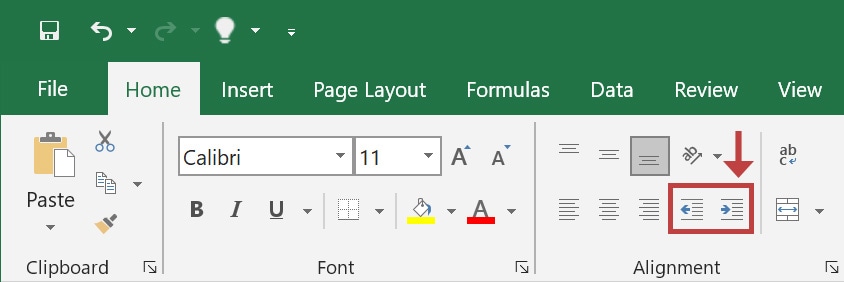
By default, Excel aligns text strings to the left of the cell and numbers to the right. If you don’t like the look of your data, you can increase or decrease the indentation. This is how to increase indent in Excel cells:
- Select the cell that contains the text you want to indent.
- Click the Home tab.
- In the Alignment group, click on the Increase Indent icon.

You can use the same process to indent multiple cells at once.
Removing cell indentation is just as easy. Follow steps 1 to 3 described above, but use the Decrease Indent icon instead.
Keep in mind that text alignment determines how Excel indents:
- If the data is aligned to the left, Excel will indent from the left.
- If the data is aligned to the right, Excel will indent from the right.
- If your content is centered, the first time you press the Increase Indent icon, Excel will align your data to the left and indent once from the left.
Indent using Format Cells dialog box
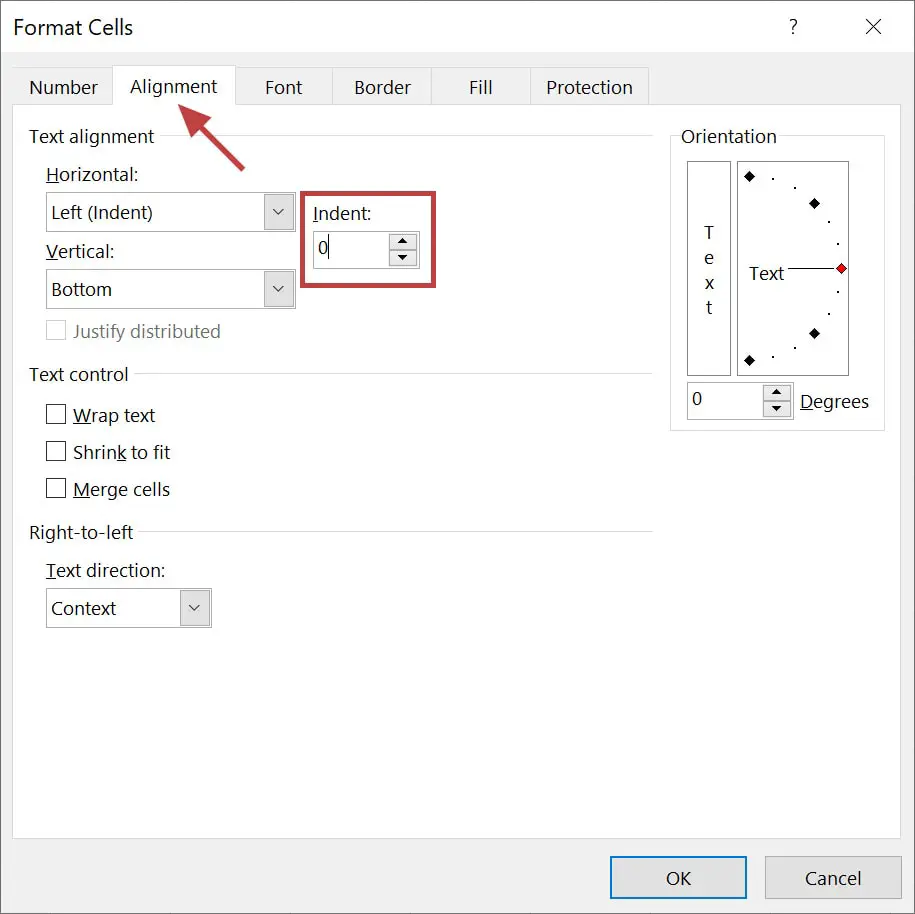
An alternative option is to indent using the Format Cells dialog box.

- Select the cell or cells that you want to indent.
- Right-click and select Format Cells.
- Click on the Alignment tab.
- Insert the indent size in the Indent field or use the up and down arrows to adjust the indentation.
- Press OK.
Each indent moves the contents of the cell to the right by about three characters.
If you want to remove the indent, follow the steps described above and insert 0 (zero) in the Indent field.
Indent individual lines in the same cell
As you might have seen, the indentation is applied to the entire cell. This means that if you have text that spans across multiple lines, you won’t be able to indent only one line using this method.
The good news is that there is a workaround to indent individual lines within the same cell. It’s not pretty, and the method can’t be applied to multiple cells at once, but it gets the job done.
For this to work properly, you need to have your text stored on multiple lines.
To achieve this, select the cell that you want to edit and press to get into the edit mode (or double-click on the cell). Position the cursor where you want to insert a new line and press + .

Once your data is split the way you want it, position the cursor at the beginning of the line and press until you are satisfied with the indentation. Move to the next row if needed and repeat. When you are done, press to finish your changes.

Here is how the indentation process looks step by step.

If you need additional spacing, all you need to do is enter the cell edit mode again and increase the indent by adding more spaces at the beginning of the lines.
How to indent in Excel using a Keyboard Shortcut
If you prefer using your keyboard, you’ll be happy to learn that two Excel indent shortcuts allow you to increase indent and decrease indent quickly.
Keyboard shortcut to Increase Indent in Excel: + +
Keyboard shortcut to Decrease Indent in Excel: + +
To use these shortcuts, select the cells where you want to apply the indentation and press the keys in the order shown above. You need to press the keys in succession (i.e., one after the other), not simultaneously.
What to do next?
If you have additional questions about how to indent in Excel, please leave a comment below. I reply to every message, and I want to help you become better.
The easiest way to learn Excel is by solving problems. This is why I have created a dedicated section with useful Excel formulas.
